Making The Torges Tree Seat For Ground Hunting
- traditionalbowhunt
- Aug 14, 2025
- 4 min read


By Al Chapman
Originally published in the February 2025 issue of TBG Magazine.
Years ago, Dean Torges shared his design for a hunting seat on the TradGang forum. The Torges Seat is easy to make with simple hand tools and it doesn’t cost much of anything to make. You may already have all that is needed.
I have made several, the first one from the original design 15+ years ago. After using it several times and being the tweaker and perfectionist I am I have modified it more than once. I have found the Torges seat to be the most versatile and easy to tote hunting seat I have, and I have bought several manufactured ones. The only downside may be that it requires a tree to set it up. You can use a stout 5” diameter tree or one much bigger depending on how long your seat rope is. Set it at any height you like and the ground doesn’t have to be level, which, by the way, makes it an excellent choice if hunting in the mountains or ridge and valley terrain. It sets up quick and easy with little noise which makes having to relocate due to wind changes or whatever very easy. If after sitting at a given height for a while and you get uncomfortable It’s simple to adjust to a different height or seat angle without removing it from the tree. I’m guessing I have given away a half dozen of these seats I made over the years. I have demonstrated them to others at hunts like the PBS bear hunt in North Georgia and sent the plans to a good many who wanted to make their own. Even if you have several of the manufactured hunting seats as I do, I am willing to bet you will be glad to have this one for any number of hunting situations as I do.
In this article I will share both the original design and my modified designs and list some add on modifications should you want to try them. Included or a few photo’s to show you how to set one up plus some add on options. Note that the photo’s show more than one seat and you will see a variety of options/add-ons I have incorporated over the years.
NOTE: The original design calls for 3/8” diameter rope and one securing hole for it to pass through. It also called for a one inch hole for the knots to pass through. I opted for ½” holes to make it easier to pass the rope through. However, I just recently heard of a fellow using smaller diameter Amsteel rope which would call for much smaller diameter holes in the seat. I have not made one using Amsteel but plan on doing so because I suspect the Amsteel rope will work just as well if not better than a non-stretch nylon rope. It would be less bulky too when carrying. I don’t have time to make one with the Amsteel by the time this article is due for publication so If any of you beat me to it using Amsteel please let me know. The knots are used to secure the seat when sitting on it and to adjust for different diameter trees as well as proper angle to get the seat to level out. I found the knot hole to be a lot of trouble working the rope through so I decided to do away with the 1” hole and just make a slot for the rope to go into. To not jeopardize the boards strength at this point I simply added a small thin piece of aluminum plate to the underside with the same cut out slot. (see photo)
Materials:
3/8th thick plywood, 3/8” non stretch nylon rope
3/8th inch plywood
Optional: (2) 2.5” x 4” x1/16” metal nail plates used for securing wires to wall studs, or 10” of water hose.


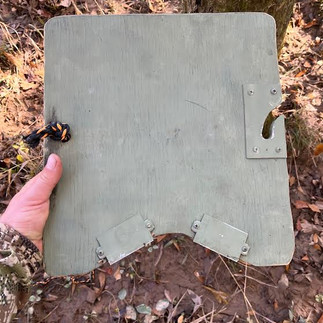


You can use a piece of water hose to help keep it from squeaking on a tree, however I tried using the nail in wiring cover plates and that’s what I will use again the next time I make the seat. Just position each of the two plates so they stick out over the back edge about 3/8ths of an inch. They'll bite into the bark good making the seat easier to set. (see photo)
It’s not necessary to wrap the rope all the way around the tree then back to the seat on large diameter trees, however, doing so works best for trees smaller than 8” diameter.
When tying knots in your rope space them 4 to 5” apart, usually 8 to 10 knots will suffice. You should start with a rope at least 7 feet long, it will shorten up a good bit with all the knots. I prefer too much rope versus not enough because I like putting the seat on huge diameter trees for better concealment. If you hunt the swamps or anywhere where old hardwoods grow you’ll be glad your rope is long.
When placing the seat on a tree you’ll likely need to position it at a 45 degree angle before you sit on it so it will level out. It may take a couple of adjustments to get it where it levels out but it’s quick and easy. This is especially true for a new seat where the rope knots haven’t tightened up from use.


Comments